1. Overview
In this tutorial, we’ll learn how to create a complete RAG chatbot system with Spring AI that allows us to chat with the documents we upload.
In short, we’ll use TikaDocumentReader to parse the document, send chunks to OpenAI, and create the embeddings.
Then, these embeddings are stored in a Postgres database using PGvector, and we can query the database to get the embeddings that are most similar to the user query.
Once we have this information, we can start a conversation with our chatbot and get the most relevant information from the document.
Let’s start by creating a new Spring AI project with Vaadin.
2. Required Dependencies
We’ll use the Spring Initializr to create a new project with the following dependencies:
- Vaadin
- OpenAI
- Tika Document Reader
- PGvector Vector Database
- Docker Compose Support (optional)
To run correctly, the application in this tutorial will use docker to create an instance of Postgres configured with PGvector extensions. Otherwise, we can use a Postgres instance of our choice and install the PGvector extension manually.
3. Configure The Application Properties
Before writing any business logic, we need to configure the application so we can select the correct OpenAI API key and models:
spring.ai.openai.api-key=YOUR_OPENAI_API_KEY
spring.ai.openai.chat.options.model=gpt-4o-mini
Here, we have decided to use the gpt-4o-mini model, but we can change it to any other available model in OpenAI.
Next, we’ll configure our vector store:
spring.ai.vectorstore.pgvector.initialize-schema=true
spring.ai.vectorstore.pgvector.index-type=HNSW
spring.ai.vectorstore.pgvector.distance-type=COSINE_DISTANCE
spring.ai.vectorstore.pgvector.dimensions=1536
Here, we have decided to use the HNSW index type and COSINE_DISTANCE as the distance type. We also set the dimensions to 1536 as this is the dimension of the embeddings generated by OpenAI.
Next, we configure a docker-compose file to start a Postgres instance with PGvector extensions:
services:
  pgvector:
    image: 'pgvector/pgvector:pg16'
    environment:
      - 'POSTGRES_DB=mydatabase'
      - 'POSTGRES_PASSWORD=secret'
      - 'POSTGRES_USER=myuser'
    labels:
      - "org.springframework.boot.service-connection=postgres"
    ports:
      - '5432'
This file is a simple docker-compose file that starts a Postgres instance with the pgvector/pgvector:pg16 image and exposes the port 5432 to the host machine. We decided to use this image because it already has the pgvector extension installed and configured. Also, we are gonna tell the application to stop the database when the application stops:
spring.docker.compose.stop.command=stop
Having added the support for Docker Compose, our application will handle the creation of the database using this configuration file and inject the correct properties to connect to the database. If we decide to use a different database, we can configure the connection properties in the application.properties file as a usual Spring Data JPA application:
spring.datasource.url=jdbc:postgresql://localhost:5432/mydatabase
spring.datasource.username=myuser
spring.datasource.password=secret
spring.datasource.driver-class-name=org.postgresql.Driver
4. Create a Vaadin Application
Now that our configuration is complete, we’ll create a Vaadin Application that allows us to upload a document and start a conversation with the chatbot.
Let’s create the main entry point of our application:
@SpringBootApplication
public class RagSpringAiApplication implements AppShellConfigurator {
    public static void main(String[] args) {
        SpringApplication.run(RagSpringAiApplication.class, args);
    }
}
We are using the AppShellConfigurator interface to configure the application shell as the standard Vaadin application.
Next, we’ll a simple layout to check if everything is working:
@Route("")
@PageTitle("Chatbot")
public class MainView extends VerticalLayout {
    public MainView() {
        add(new H1("Hello, World!"));
    }
}
If everything is working correctly, we should see a simple page with the title “Hello, World!”:

Now that we have a simple application’s backbone, we can start building all the services and components we need.
5. Create Upload Component
The first thing we need is a component that allows us to upload a document to the server. For this, we’ll use the Upload component from Vaadin and extend it to match our needs:
private Upload createUploadComponent() {
    MultiFileMemoryBuffer buffer = new MultiFileMemoryBuffer();
    Upload upload = new Upload(buffer);
    upload.setAcceptedFileTypes(".txt", ".md", ".pdf");
    upload.addSucceededListener(handleUpload(buffer));
    upload.setWidthFull();

    List<String> savedResources = jdbcTemplate.queryForList("SELECT distinct metadata->>'source' FROM vector_store", String.class);
    uploadedFiles.setItems(savedResources);

    return upload;
}
This method creates an Upload component that only accepts .txt, .md, and .pdf files. We handle the upload using the handleUpload method and set the width of the component to full.
As we are using PostgreSQL, we can easily inject the JdbcTemplate to query the database and get the list of uploaded files so we can load the previously uploaded files. Once we have the list of uploaded files, we can display them in a MultiSelectComboBox component so we can select the file we want to chat with. For simplicity, we are not going to handle contexts for multiple users. Therefore, all the loaded files will be available for all users. To handle multiple users, we can filter the files by user id or session id.
Moving on, let’s implement the handleUpload method:
private ComponentEventListener<SucceededEvent> handleUpload(MultiFileMemoryBuffer buffer) {
    return event -> {
        String fileName = event.getFileName();
        TikaDocumentReader tikaReader = new TikaDocumentReader(new InputStreamResource(buffer.getInputStream(fileName)));
        TextSplitter textSplitter = new TokenTextSplitter();
        List<Document> parsedDocuments = textSplitter.apply(tikaReader.get());
        parsedDocuments.forEach(document -> document.getMetadata().put("source", fileName));
        vectorStore.accept(parsedDocuments);
        uploadedFiles.getListDataView().addItem(fileName);
 };
}
This method creates a TikaDocumentReader and a TokenTextSplitter to parse the document and split it into chunks. Then, we store the embeddings in the database and add the file name to the list of uploaded files. Saving the file name allows us to query the database for the most similar embeddings to the user query.
The vectorStore is an instance of VectorStore that we inject using Spring’s dependency injection. Unless we want custom behavior, we can use the default implementation provided by Spring AI. We can easily swap the implementation of the VectorStore interface to use a different database or storage system. The VectorStore behind the scenes will use OpenAI to generate the embeddings and store them in the database. We can configure different embedding generators and storage systems using the application.properties file.
Next, let’s display the upload component and the selector of the uploaded files in the main view:
private final transient VectorStore vectorStore;
private final transient JdbcTemplate jdbcTemplate;
private final MultiSelectComboBox<String> uploadedFiles;

public MainView(VectorStore vectorStore,
                JdbcTemplate jdbcTemplate) {
    this.vectorStore = vectorStore;
    this.jdbcTemplate = jdbcTemplate;

    uploadedFiles = new MultiSelectComboBox<>("Files to include");
    uploadedFiles.setWidthFull();

    Upload upload = createUploadComponent();

    HorizontalLayout filesLayout = new HorizontalLayout(upload, uploadedFiles);
    filesLayout.setWidthFull();
    filesLayout.setDefaultVerticalComponentAlignment(Alignment.BASELINE);
    filesLayout.setFlexGrow(1, uploadedFiles);
    add(filesLayout);
}
If we run the application now, we should see the upload component and the list of uploaded files:

We can now upload the document and let the application process it. Once the document is processed, we can check the list of the uploaded files in the multi-select combo box.
6. Create ChatService
Now that we have the document uploaded, we want to create a chat-like view that allows us to interact with it.
Before working with the graphical user interface, we want to abstract the chat logic from the view in a spring service. In short, we want a method that takes a prompt, a conversation id, and a list of source files and returns the chatbot’s response.
First, we’ll define a system prompt that will guide the LLM model on how to respond to the user query:
private static final String SYSTEM_PROMPT = """
 You are an expert in various domains, capable of providing detailed and accurate information.
 Using the context provided by recent conversations, answer the new question in a concise and informative manner.
 Limit your answer to a maximum of three sentences.
 Your response is always a simple text.
 """;
Second, we’ll create an in-memory chat history using the ChatMemory abstraction provided by Spring AI. This will allow us to persist the conversation history in memory so that we can use it to provide historical context to the chatbot and load the conversation history when the user returns to the chat.
Third, we’ll attach a QuestionAnswerAdvisor to the chat client so we can query the database for the most similar embeddings to the user query based on the source files.
This advisor will use the VectorStore to query the database and get the most similar embeddings to the user query:
private final ChatClient chatClient;
private final ChatMemory chatMemory;

public ChatService(ChatClient.Builder chatClientBuilder,
                   VectorStore vectorStore) {
    chatMemory = new InMemoryChatMemory();
    QuestionAnswerAdvisor questionAnswerAdvisor = new QuestionAnswerAdvisor(vectorStore);
    this.chatClient = chatClientBuilder
            .defaultSystem(SYSTEM_PROMPT)
            .defaultAdvisors(
                    new MessageChatMemoryAdvisor(chatMemory),
                    questionAnswerAdvisor,
                    new SimpleLoggerAdvisor())
            .build();
}
Also, for simplicity, we are using the SimpleLoggerAdvisor to log the chat history to the console.
Moreover, Spring AI offers this abstraction to allow us to easily swap advisors and customize the chatbot’s behavior. We can think of advisors as a chain of responsibility pattern where each advisor can modify the message before sending it to the LLM model—something like filters in Spring Security.
At the end of the constructor, we assemble all the pieces and have a ChatClient instance that we can use inside our ChatService.
Keep in mind that we are not specifying which model to use here. We know that we defined OpenAI as the only dependency of this project, so the ChatClient will use OpenAI as the LLM model. If we want to use a different model, first, we need to include the dependency in the pom.xml file and then inject the correct model using the @Qualifier annotation. Alternatively, we can explicitly build the ChatClient with the correct model:
var openAiApi = new OpenAiApi(System.getenv("OPENAI_API_KEY"));
var openAiChatOptions = OpenAiChatOptions.builder()
    .withModel("gpt-3.5-turbo")
    .withTemperature(0.4)
    .withMaxTokens(200)
    .build();
var chatModel = new OpenAiChatModel(this.openAiApi, this.openAiChatOptions);
We don’t need to worry about the model configuration because we already set it in the application.properties file. The ChatClient will use the model we put in the configuration file.
Finally, we’ll create a method that takes a question, a conversation id, and a list of source files and returns the response from the chatbot:
public ChatResponse ask(String question, String conversationId, Set<String> sourceFiles) {
    String sourcesFilter = String.format("source in ['%s']", String.join("','", sourceFiles));
    return chatClient.prompt()
                .user(question)
                .advisors(spec -> spec.param(CHAT_MEMORY_CONVERSATION_ID_KEY, conversationId))
                .advisors(spec -> spec.param(FILTER_EXPRESSION, sourcesFilter))
                .call()
                .chatResponse();
}
The first thing we do is create the filter expression that we will use to filter the embeddings by the source files. Then, we prompt the ChatClient with the user question, the conversation id, and the filter expression. Finally, we return the chat response.
Having configured the advisors in the constructer is half of the work. The other part of using the advisors correctly is that, with each prompt, we must pass them the needed parameters. In this case, we are passing the conversation id to the MessageChatMemoryAdvisor and the filter expression to the QuestionAnswerAdvisor. How these advisors use these parameters is up to the advisor’s implementation. For example, we are using the source metadata field to filter the embeddings by the source file. Internally, the QuestionAnswerAdvisor will use this information when querying the VectorStore. This advisor provides a simple way to filter the embeddings by the source file. We can use more complex filters to filter the embeddings by the user id, session id, or any other metadata field.
7. Create ChatView
Now that we have the chat service, we can create a view that allows us to chat with the document.
First, we’ll create a simple TextField to input the user prompt:
private TextField createMessageField() {
    TextField questionField = new TextField("Ask your question");
    questionField.setWidthFull();
    return questionField;
}
Then we’ll create a Button that allows us to send the message to our LLM model:
private Button createSendButton(ChatService chatService, TextField messageField) {
    Button askButton = new Button(VaadinIcon.PAPERPLANE.create(), handleNewMessageRequest(chatService, messageField, chatContainer));
    askButton.addThemeVariants(ButtonVariant.LUMO_PRIMARY);
    askButton.addClickShortcut(Key.ENTER);
    return askButton;
}
We are using the handleNewMessageRequest method to handle the user request. In short, we read the user input, add the user message to the chat container, ask the chat service for the response, and add the chatbot response to the chat container, which is a VerticalLayout:
private ComponentEventListener<ClickEvent<Button>> handleNewMessageRequest(ChatService service, TextField messageField, VerticalLayout chatContainer) {
    return _ -> {
        if (StringUtils.isBlank(messageField.getValue())) {
            Notification.show("Please enter a question");
        } else {
            chatContainer.add(getMessageBlock(new UserMessage(messageField.getValue())));
            AssistantMessage answer = service.ask(messageField.getValue(),
                            UI.getCurrent().getSession().getSession().getId(), uploadedFiles.getValue())
                                 .getResult().getOutput();
            chatContainer.add(getMessageBlock(answer));
        }
    };
}
We are using the session id as the conversation id to simplify the history management. To remove the history, we’ll create a delete button that will remove the conversation history from the ChatMemory instance:
private Button createClearHistoryButton() {
    Button clearHistory = new Button(VaadinIcon.TRASH.create(), handleSessionClear());
    clearHistory.addThemeVariants(ButtonVariant.LUMO_ERROR);
    return clearHistory;
}
Now, we’ll assemble all the components in the MainView:
public MainView(VectorStore vectorStore,
                JdbcTemplate jdbcTemplate,
                ChatService chatService) {
    this.vectorStore = vectorStore;
    this.jdbcTemplate = jdbcTemplate;
    this.chatService = chatService;
    chatContainer = createChatContainer();
    setSizeFull();
    TextField messageField = createMessageField();

    Button askButton = createSendButton(chatService, messageField);
    Button clearHistory = createClearHistoryButton();

    HorizontalLayout messageBar = new HorizontalLayout(messageField, askButton, clearHistory);
    messageBar.setDefaultVerticalComponentAlignment(Alignment.BASELINE);
    messageBar.setWidthFull();
    messageBar.setFlexGrow(1, messageField);

    Scroller scroller = new Scroller(chatContainer);
    scroller.setWidthFull();

    VerticalLayout chatBox = new VerticalLayout();
    chatBox.setMaxHeight(80, Unit.PERCENTAGE);
    chatBox.add(scroller, messageBar);
    chatBox.setFlexGrow(1, scroller);

    uploadedFiles = new MultiSelectComboBox<>("Files to include");
    uploadedFiles.setWidthFull();

    Upload upload = createUploadComponent();

    HorizontalLayout filesLayout = new HorizontalLayout(upload, uploadedFiles);
    filesLayout.setWidthFull();
    filesLayout.setDefaultVerticalComponentAlignment(Alignment.BASELINE);
    filesLayout.setFlexGrow(1, uploadedFiles);
    add(filesLayout, new Hr(), chatBox);
    setFlexGrow(1, chatBox);
    setWidthFull();
}
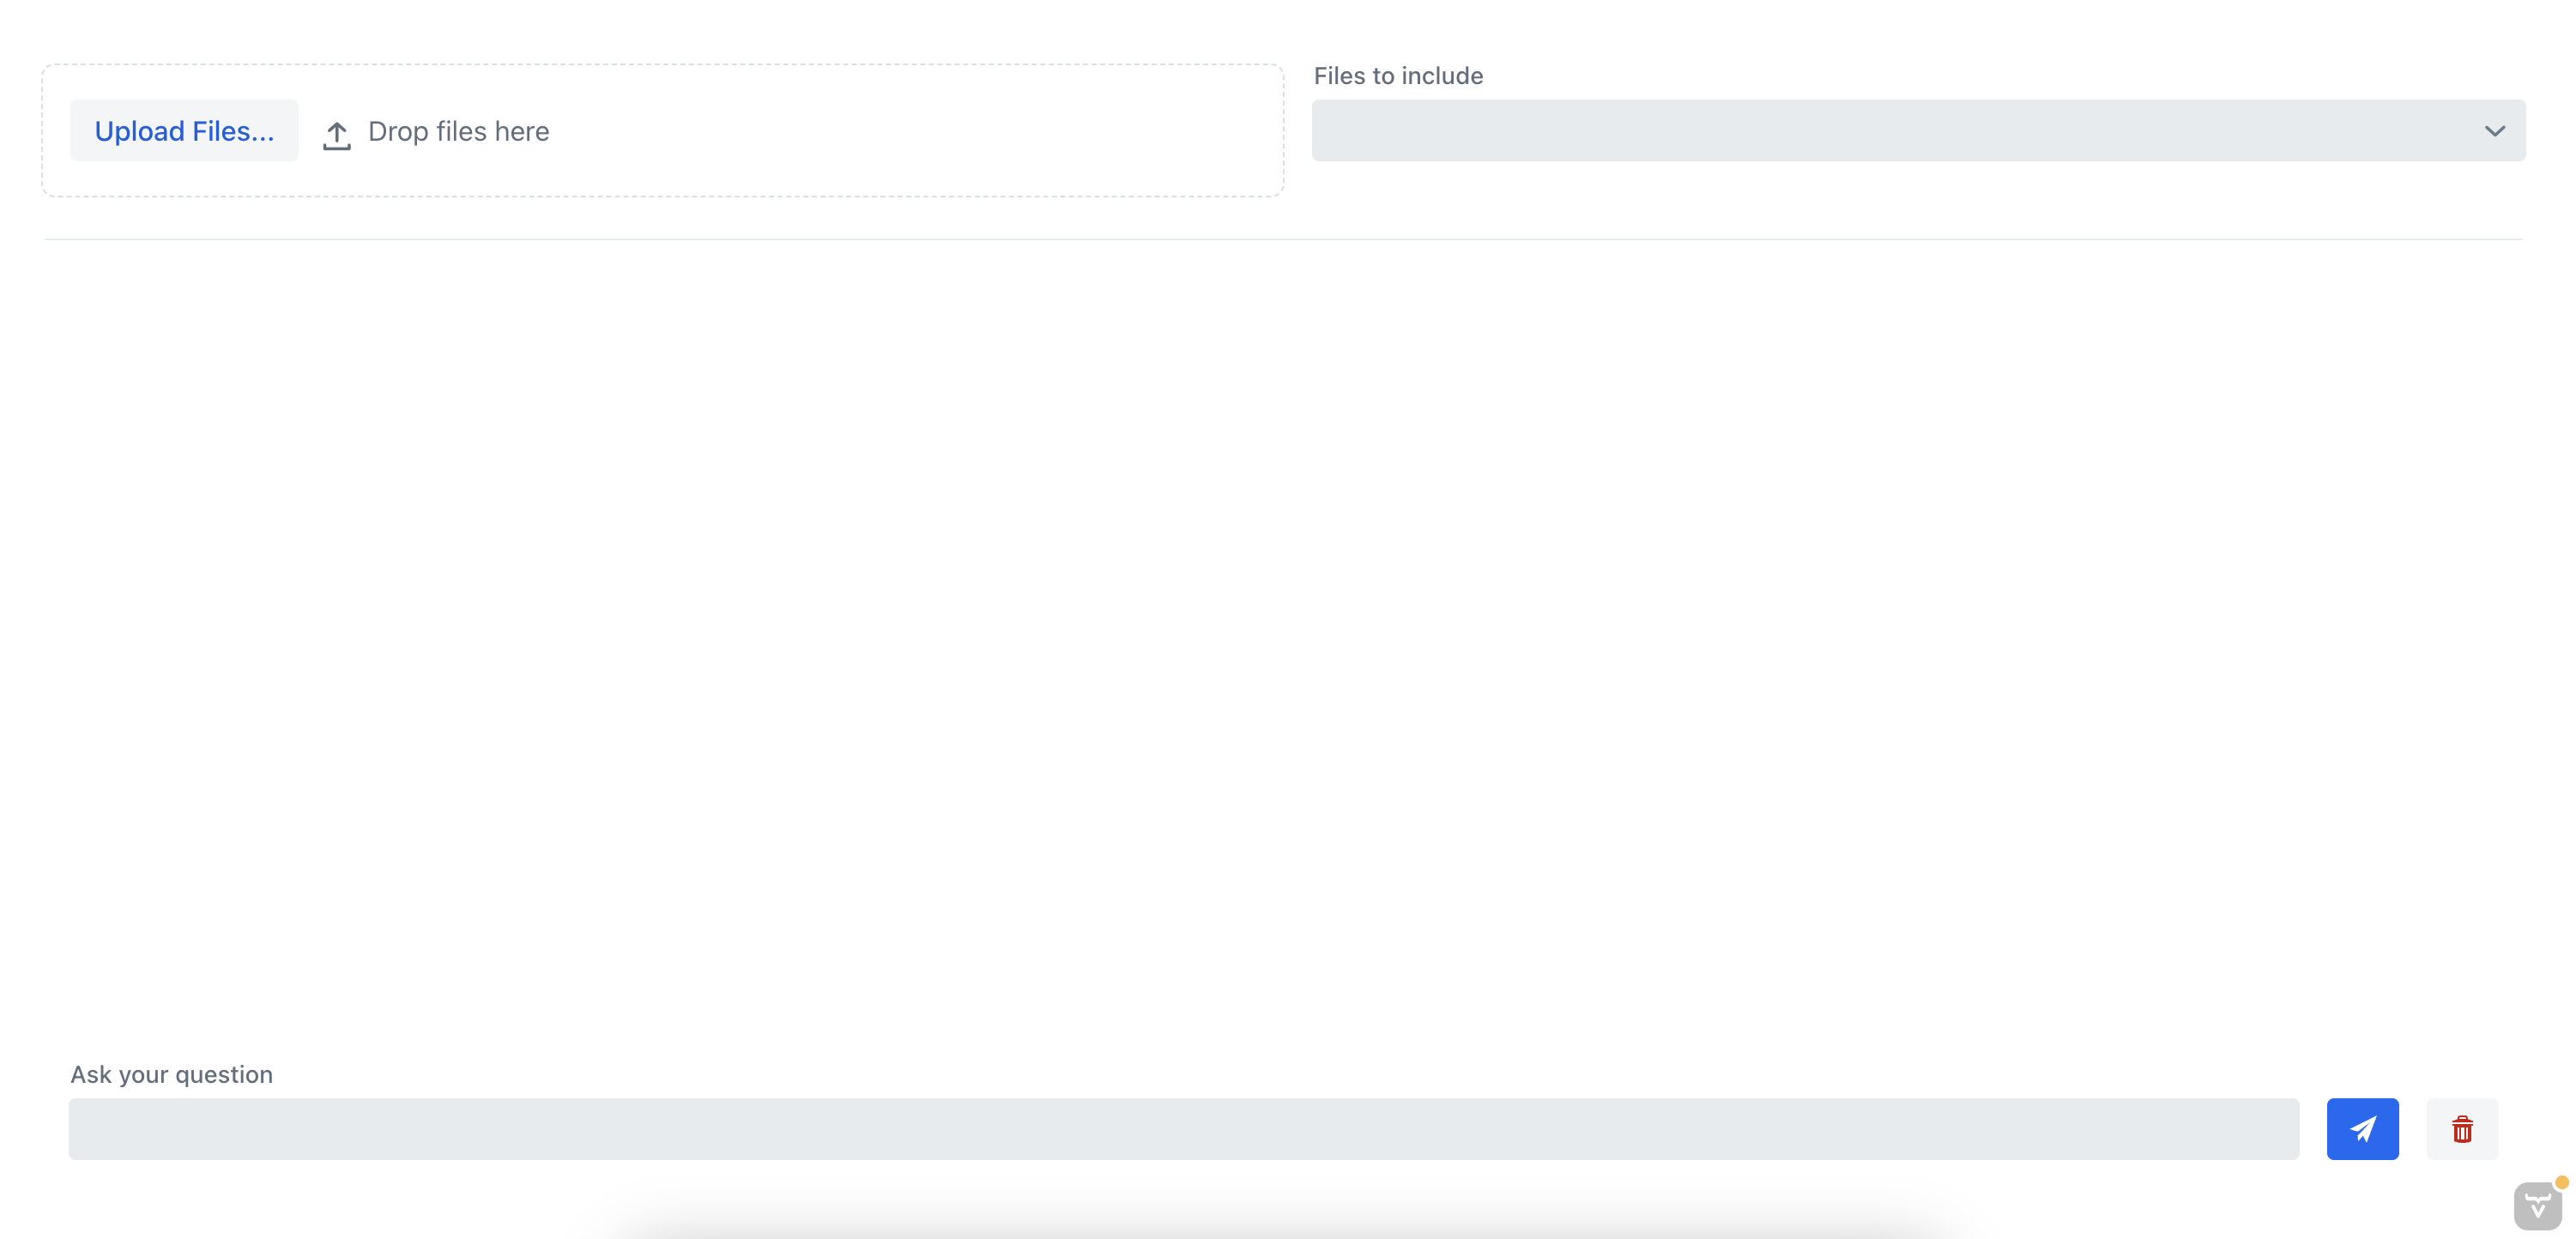
If we run the application now, we should see the chat view that allows us to chat with the document:

8. Testing The Application
Let’s test the application by uploading a document and chatting with the chatbot. Previously, we uploaded a document with instructions on how to install a MongoDB server.
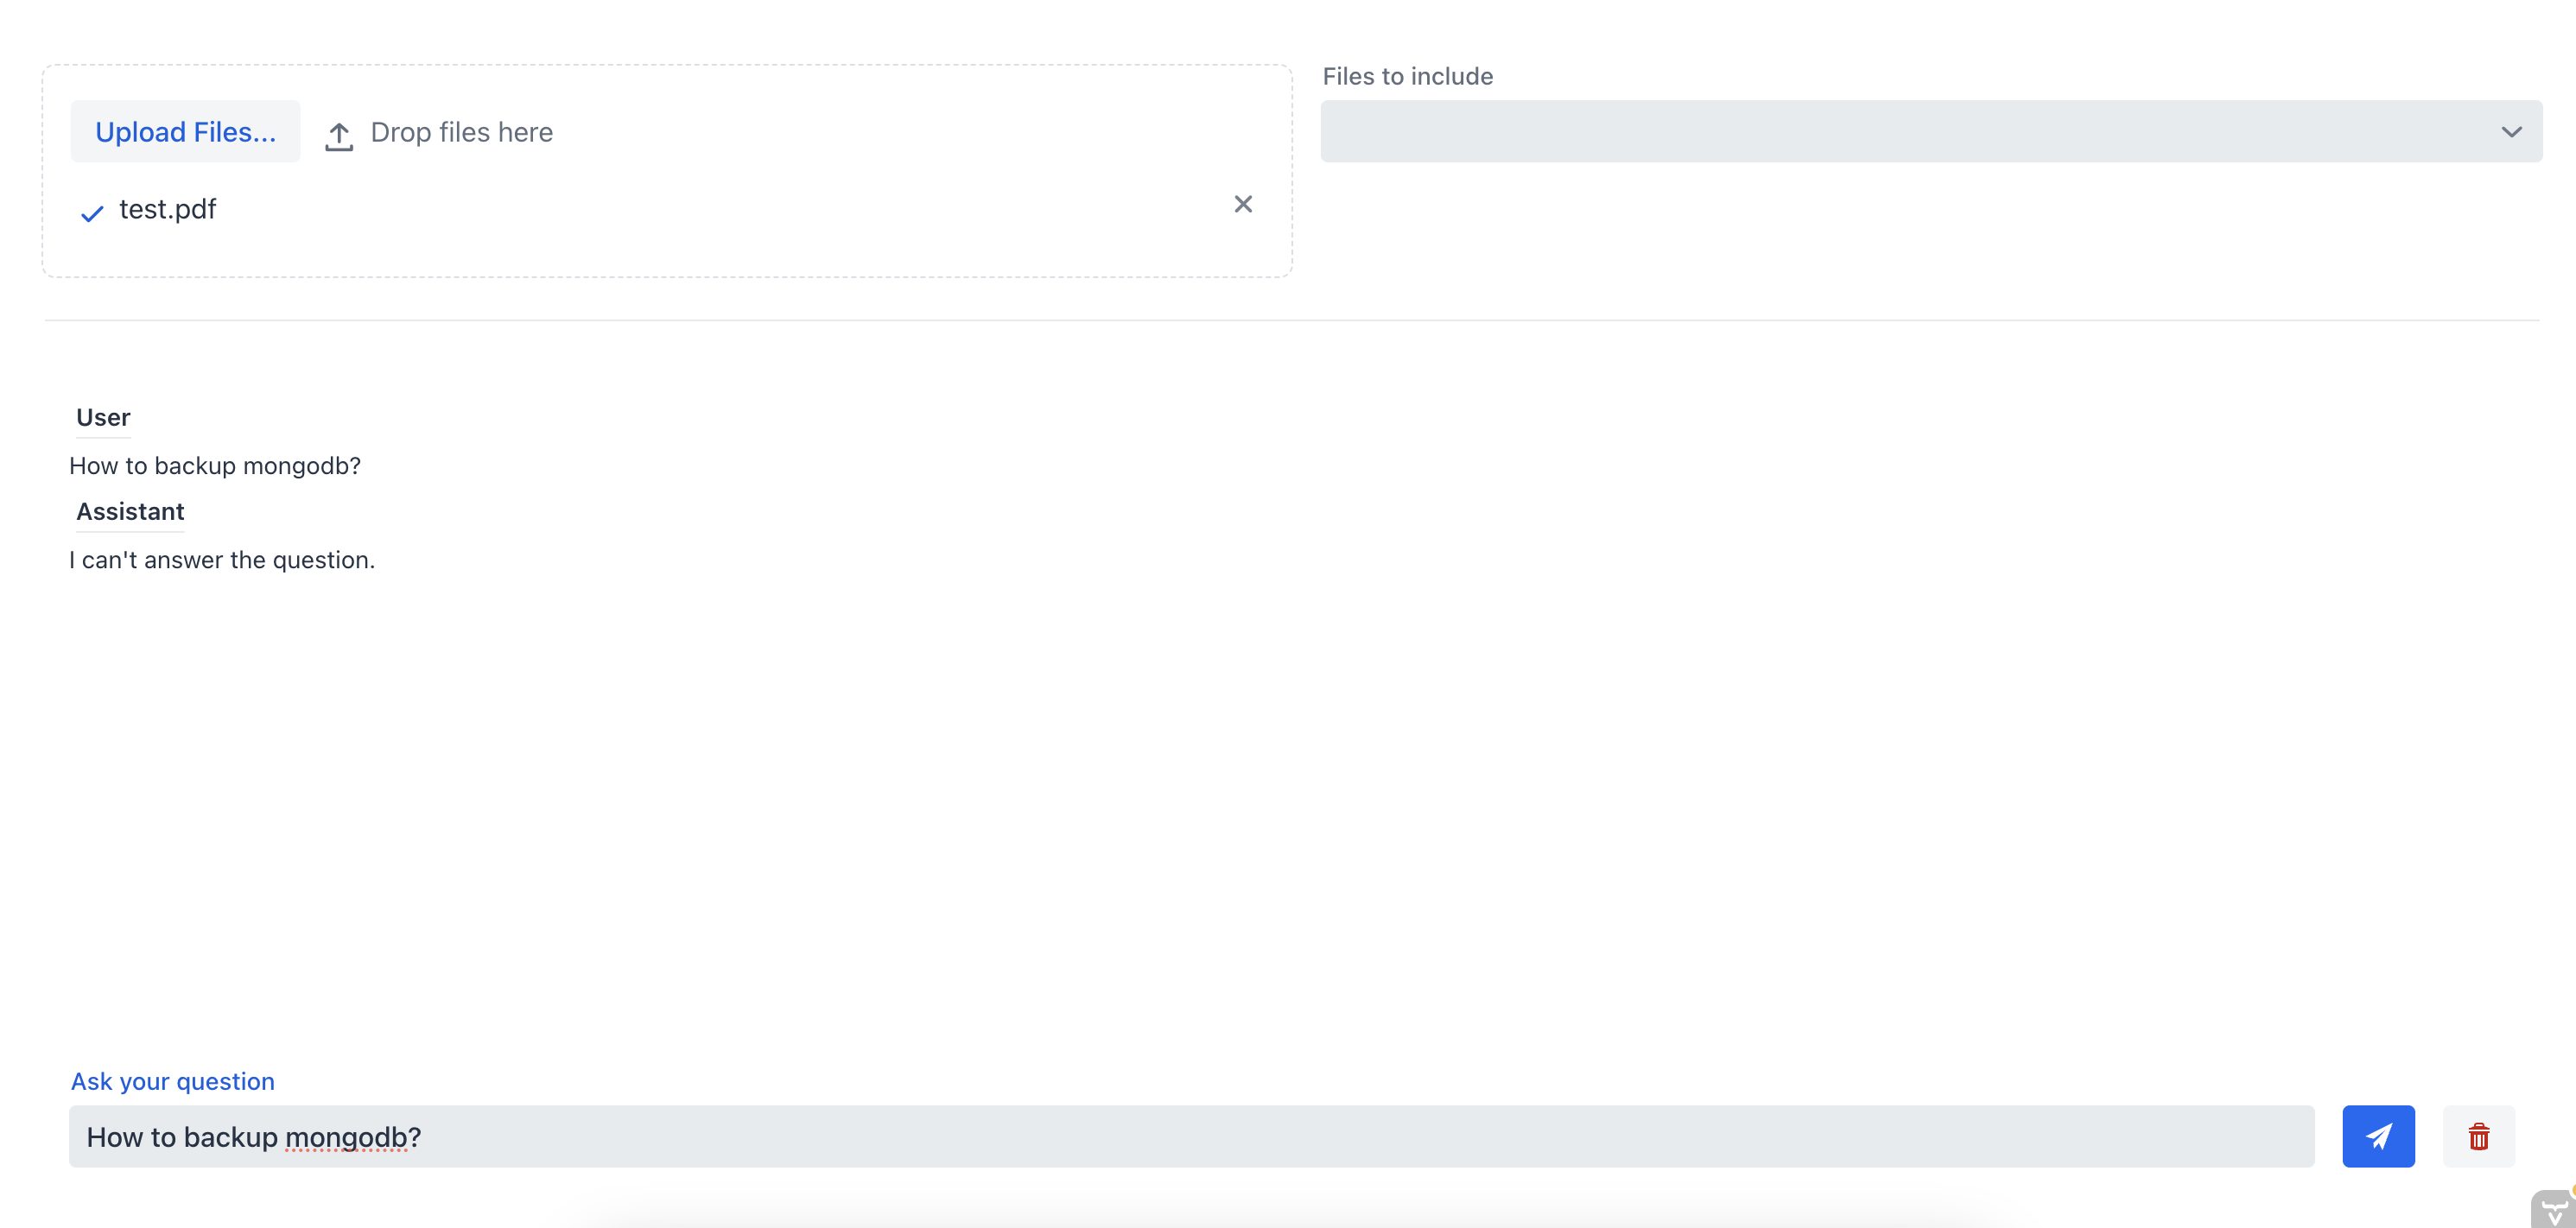
First, let’s ask the chatbot how to backup the MongoDB server without specifying the source file:

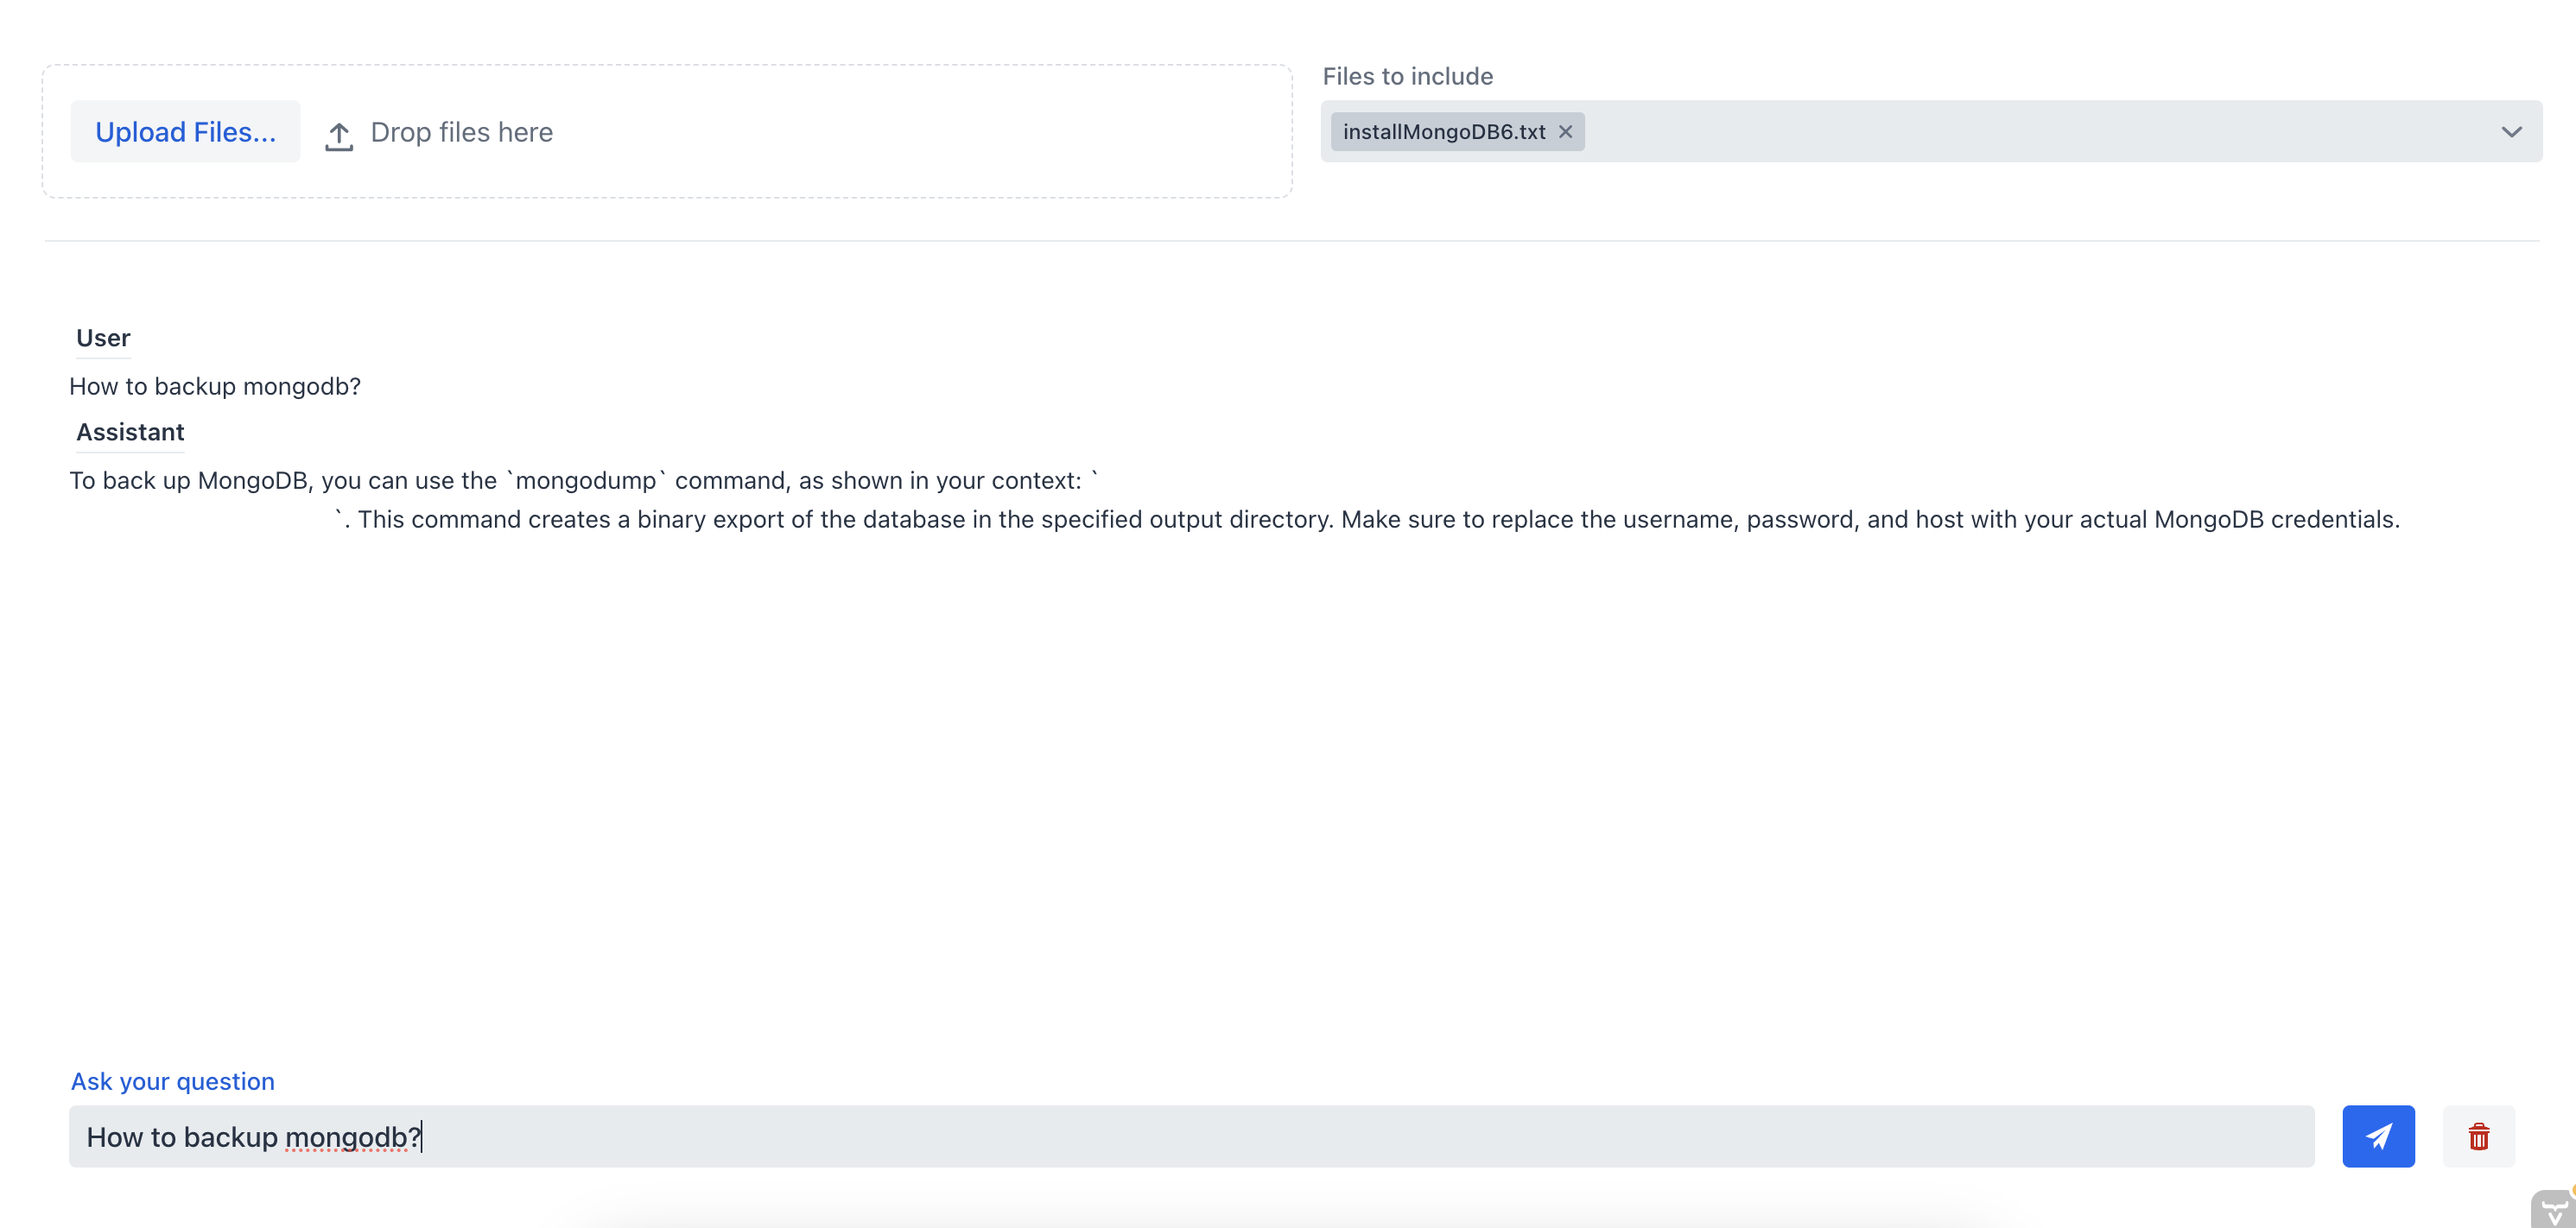
As we can see the chatbot is not able to provide a good answer because it doesn’t have the context of the document. Now, let’s ask the chatbot the same question but this time we are going to select the source file from the multi-select combo box:

In this instance, the chat assistant was able to provide the correct answer because it had the context of the document. This demonstrates the effectiveness of the RAG chatbot; by supplying context to the chatbot, we can obtain the most relevant information from one or multiple documents.
9. Conclusion
In this tutorial, we learned how to create a complete RAG chatbot system with Spring AI that allows us to chat with a document we upload. We used the TikaDocumentReader to parse the document and then send chunks of the document to OpenAI to create the embeddings. These embeddings are stored in a Postgres database using pgvector, and we can query the database to get the embeddings that are most similar to the user query. Once we have this information, we can start a conversation with our chatbot and get the most relevant information from the document.
We can look for the complete code on Github

